Showing posts with label cuttlebug. Show all posts

Tuesday, February 21, 2012

February Hostess Cards


I almost never gravitate to yellows, maybe because it's just not a great color on me,so when I decided to come up with a couple of cards for my monthly hostess club ladies, I challenged myself to use yellows. Buttercup met honey and my yellow monochromatic butterfly card was done. A cuttlebug embossing folder was used on the first buttercup layer to give another dimension, then a layer of honey for contrast, a pinstriped embossed buttercup which we made scoring every line on a Martha Stewart scoring pad ( you could also use your stylus and 12" fiskar trimmer). Our beautiful lacy butterflies were cut using the AP Cricut cartridge in Honey and popped up in the center using foam tape and accented with 3 white pearls. A simple white bow finishes the card. I like to sometimes not include a sentiment so that I have cards on hand that I can personalize as I need them.

The new Card Word Puzzle is such a fun stamp set and I just love the Rose image that is part of this set. Our next card uses a heat embossing technique that is so much fun. We started out with white cardstock and stamped the rose image three times on the white with versamark, then we sprinkled the versamark image with clear detail embossing powder and heat embossed it. Using a sponge and Grey Wool ink we worked the grey wool ink over the entire white cardstock in a circular motion. Then a phrase was stamped in black surrounded by a frame cut with the AP Cricut cartridge in black cs accented with small white pearls. This layer was mounted on buttercup, then black and finally the base white card. I didn't take a picture but a single grey wool rose is stamped inside the card as well.


Sunday, November 20, 2011

I've been creating, just not posting, sorry

This has been a really crazy month for me. I went to visit my DD's family over Halloween, We had a great time, with the weather turning crisp and the leaves changing into a burst of autumn glory. She lives in a area that is totally natural and in the summer it is hard to find the sunshine, but oh how glorious it is in the fall. Had fun helping with Halloween costumes, attended both school and neighborhood festivials and did some shopping.
What I also did was come home with a nasty cold which flared up my COPD and my chronic broncities and landed me in bed for over a week when I got home.
So now to show you some of the projects that I've done with my crafting ladies that meet here once a month.
Love the easel cards and using Art Philosophy for all the cuts is so simple and easy. I told you I love red plaid and poinsettia, so you will see a theme to my Christmas creations this year. The Believe paper pack is just perfect and of course this is my favorite one in the pack.
Gold embossing the words, just as a pop of glam, don't you think?

Used my silver metallic cardstock and some outdoor denim cardstock and of course my favorite cartridge, AP fir te cuts. Then embossed some of the same silver cardstock with a cuttlebug folder that looked like swirly snow to complete the outside. I've got more to post and will try and get to them later today to try and get caught up. I've just started playing with my design studio software that I was unable to use due to computer conflict and I've been having a great time. Hope you all are having as much fun as I am.

Monday, September 26, 2011

Starting early on Christmas this year

Ok well I guess those cute little pencils toppers got me thinking about doing my Christmas cards early this year. I wanted to share with you my favorite one that I made last year, put away in a safe place, then couldn't find it and thought I had actually sent it to someone without making a copy for my card book. Well I found it in it's safe place and photographed it for you.
Just click on the card to enlarge it and see more detail.
Simple, elegant, embossed lines with the scor pal and swiss dots cuttlebug embossing folder, embossed only in the middle of the card. Labels 4 nestabilities in the two largest sizes pop dotted to add dimension. Stamped the image from Snow Days C 1420 in black, then lightly went over the branches with brown watercolor pencil, the bridge was colored with grey, tree a light green and water light blue. I wanted everything muted and soft. The snow areas were covered with a homemade flower soft in white, that I made by grating some foam board with a very fine cheese grater. The sentiment is from the stamp set Captured Moments C1423. another one of my favorites. A couple of pearl adhesve gems finishes off the card. I hope you enjoy this one. Now I need to make another so I can send it off this year. I love the white on white with just the hint of color, don't you?

Sunday, September 25, 2011

Merry Pursuits Round Scalloped Easel Card


Surprise I'm also a gift card holder, the perfect size to tuck that wonderful gift for your special someone.
The cuts are so easy with the Art Philosophy cartridge, everything lines up so perfectly and are so crisp and perfect. The card base is cut out of retired Textured New England Ivy cardstock using the card feature on page 31 and cut at 4 1/4 inch. This will fit nicely in a standard size envelope for mailing. You will also need 1 page 31 cut at 4 1/4 for the top of the card from cardstock and 1 of the same size cut from Background and Texture paper or patterned paper of your choice. I used some retired CTMH paper that I had on hand. You will need to also use the regular circle found on page 21 and cut (1) at 2" in white, (1) at 2 1/4" in New England Ivy and (1) at 2 1/2 in white (which I embossed with a cuttlebug folder), (1) at 3" in New England Ivy and (1) at 3" in Background and Textured paper. I used the red side of the B&T.
.  
Fold the TOP of the card base in half and fold back on itself.
Adhere the Background and Textured 4 1/4" scalloped circle to the 4 1/4" New England Ivy scalloped circle matching the scalloped, so easy since they are identical cuts.

Stamp your image on the 2" white circle, I used one of the little elves from Merry Persuits B1313 and colored him with a waterbrush and ink from the top of the stamp pads. I embossed the larger white circle using a cuttlebug folders with snowflakes, then glued the 2" onto the 2 1/4", then onto the embossed 2 1/2 circle These were glued off center with upper right edges lining up. Then this unit was glued to the prepared card top.
Line the top unit up with the card base that is folded backwards and glue just the upper edges.
I finished the inside by taking the B&T 3" circle and folding it in half and gluing those halves together to give it more bulk since this is the lip that the easel sits on. I glued the half circle to the 3" New England Ivy circle only at the edges making sure that my card would fit into the pocket and then added a double bow and ribbon and a snowflake button. The placement of my circle unit was determined by the size of my gift card. I think I will go back and distressed the outer edges of the inside card with some New England Ivy ink to add something extra. The double bow with the gathered tails were added to the front of the card and I just love the effect.
What do you think?

Life's Good

The weather is starting to cool down here in southeastern Virginia and soon the leaves will begin to turn colors. Here is one of the cards that we made last week at my Hostess Club in honor of fall. I love the warm colors and the Art Philosophy cartridge made it so easy to do all the cuts. I used the Dreaming paper cut 1/4 inch smaller than my colonial white card base, the Oval 5 cut at 4 inches from Colonial White and then stamped with 2nd generation chocolate ink using the words from D1477 universal backgrounds. I distressed the edges with chocolate ink. Next I cut out 2 acorns from page 36 of the AP cartridge book at 1 inch in colonial white and 2 acorn caps from chocolate and embossed them using a cuttlebug folder.The acorns I stamped in desert sand using universal backgrounds and distressed the edges with desert sand to give some definition. The leaves were cut at 2 inches from page 34 of the AP book and stamped with the coordinating stamp that comes with the AP cartridge. They were inked first in Honey then before stamping I touched the edges on the Autumn Terracotta pad then stamped and edged with sponge dauber in chocolate. A chocolate grosgrain bow was added to tie the leaves and acorns together. The Ticket was from the You and Me stamp set D1495 and the ticket was cut from page 25 of the AP book at 1" stamped in chocolate and distressed with chocolate with a chocolate brad. Inside I have the little owl from the Pair a Phrase stamp set shown in an earlier post. 
I hope you like this, it was so easy to put together using the Art Philosophy cartridge.
As always to see a closer look at this card simply click on the card to enlarge.

Friday, August 12, 2011

Two of my Favorite Things, and they are both embossed

I can't think of any technique which say Wow like embossing. Whether you are using embossing powder and a heat gun to give your stamped image that shine and pizazz that pops off the cardstock or the deep impressions you get using a dry embossing template, nothing attracts more attention, making the simplest of designs extra special. Here are some examples of both types. Shiny Black butterflies colored with inks and a water brush, jump off the card where white embossed  simple flowers form the background of the card. Click on an image to see more detail.

The stamp set used on the blue card is Treasure Life D1306 for the flowers, I believe the butterfly is retired.

My personal favorite is the look of dry embossing which is easily obtained by using your embossing templates and your sizzix or cuttlebug machine. I think I could add embossing to just about every project and it wouldn't be too much. The texture is something special and adds the Wow factor to plain white cardstock like nothing else does.
White Daisy cardstock and black ink stamped between two sections of dry embossing using the Dotted Swiss cuttlebug embossing template. Stamp set is Captured Moments C 1423. Another example of this stamp set (one of my favorites) is in the next card. I believe that the embossing template is Branches by cuttlebug, the paper is some old retired CTMH and the image is stamped in Chocolate and color added by CTMH markers in fall colors.

Another great technique with the dry embossing is to emboss on colored cardstock, and CTMH has the perfect white core colored cardstock for the technique. Simple dry emboss using the dotted swiss cuttlebug folder, and sand lightly exposing the white core and the embossing pops off the cardstock. Each layer was dry embossed on this last card and I love the effect. Stamps from The Present D1436.

Tuesday, August 9, 2011

CTMH Scallop Punch

CTMH scallop punch, Z1392, is so easy to use and is one of the most versatile accessories to add that something extra to your cards, scrapbooking and paper crafts. Thanks to an extremely talented Close To My Heart consultant Brenda Freichs and her Stamp, Scrap, Create blog posts and tutorials, I was able to put together this display board to teach my Hostess Club some great flowers that can be created with this scalloped punch and a few snips here and there.

Just click on the above board to see a larger view.
Cut in and removed every other scallop as shown in the white punched circle shown to the right of the card. Layer two or more prepared scalloped circles, off set from each other and enhanced with ink..

Two scalloped circle flowers created by cutting between every two scalloped, stacked and paired up with an embossing folder, makes a simple but fun card for many occasions.


Sunday, September 27, 2009

Merry Pursuits

Yep, I'm already working on Christmas cards. I know it's early, but
I have so many terrific ideas that if I don't start now I won't get them
done. This one combines my love of Cuttlebug embossing folders,
Nestabitlies and stamping. This little guy and 3 of his friends make
Merry Pursuits B1313 a wonderful stamp set for young and old. Get your little ones involved in your cards this year and stamp up the images and let them do the coloring, then together you can assemble the cards and make it truly a family card. Whether you color these with crayon, colored pencils or markers like my elf, it's fun and easy.

As always to order any of the great Close To My Heart products that you see, just click on the link to be taken to my consultant website. While you are there, take a look around, you will be able to view all the current catalogs with the click of your mouse at the Products tab, view other artwork I've done at My Art, check out specials in the center section, view the current Stamp of the Month and additional artwork for these special stamps by clicking on the box for Stamp of the Month on the right side. In addition you will be able to watch webisodes of stamping techniques at the CTMH TV link and order all your favorite products at Shop Online. Scrapbookers and cardmakers should check out the Workshops on the Go link to view layouts using the Level 2 My Reflections papers with directions on how to create the featured artwork. There is something for everyone and I'd love to hear from you to let me know what you found helpful. I've been having some problems updating My calendar, but check back often as I will be posting upcoming workshops for Christmas cards and techniques.

Happiness Cards


Two very different cards, both using unique techniques, with the Happiness stamp set C 1310. The circle card was made top opening and cut using a coluzzle circle, placing the template just below the top of a top fold card and cutting both front and back at the same time, leaving the hinge area intack. Again one of the favorite colors purple pansy is used, this time dry embossed and lightly sanded for the embossed lines to stand out. The flower is pop dotted for dimension.


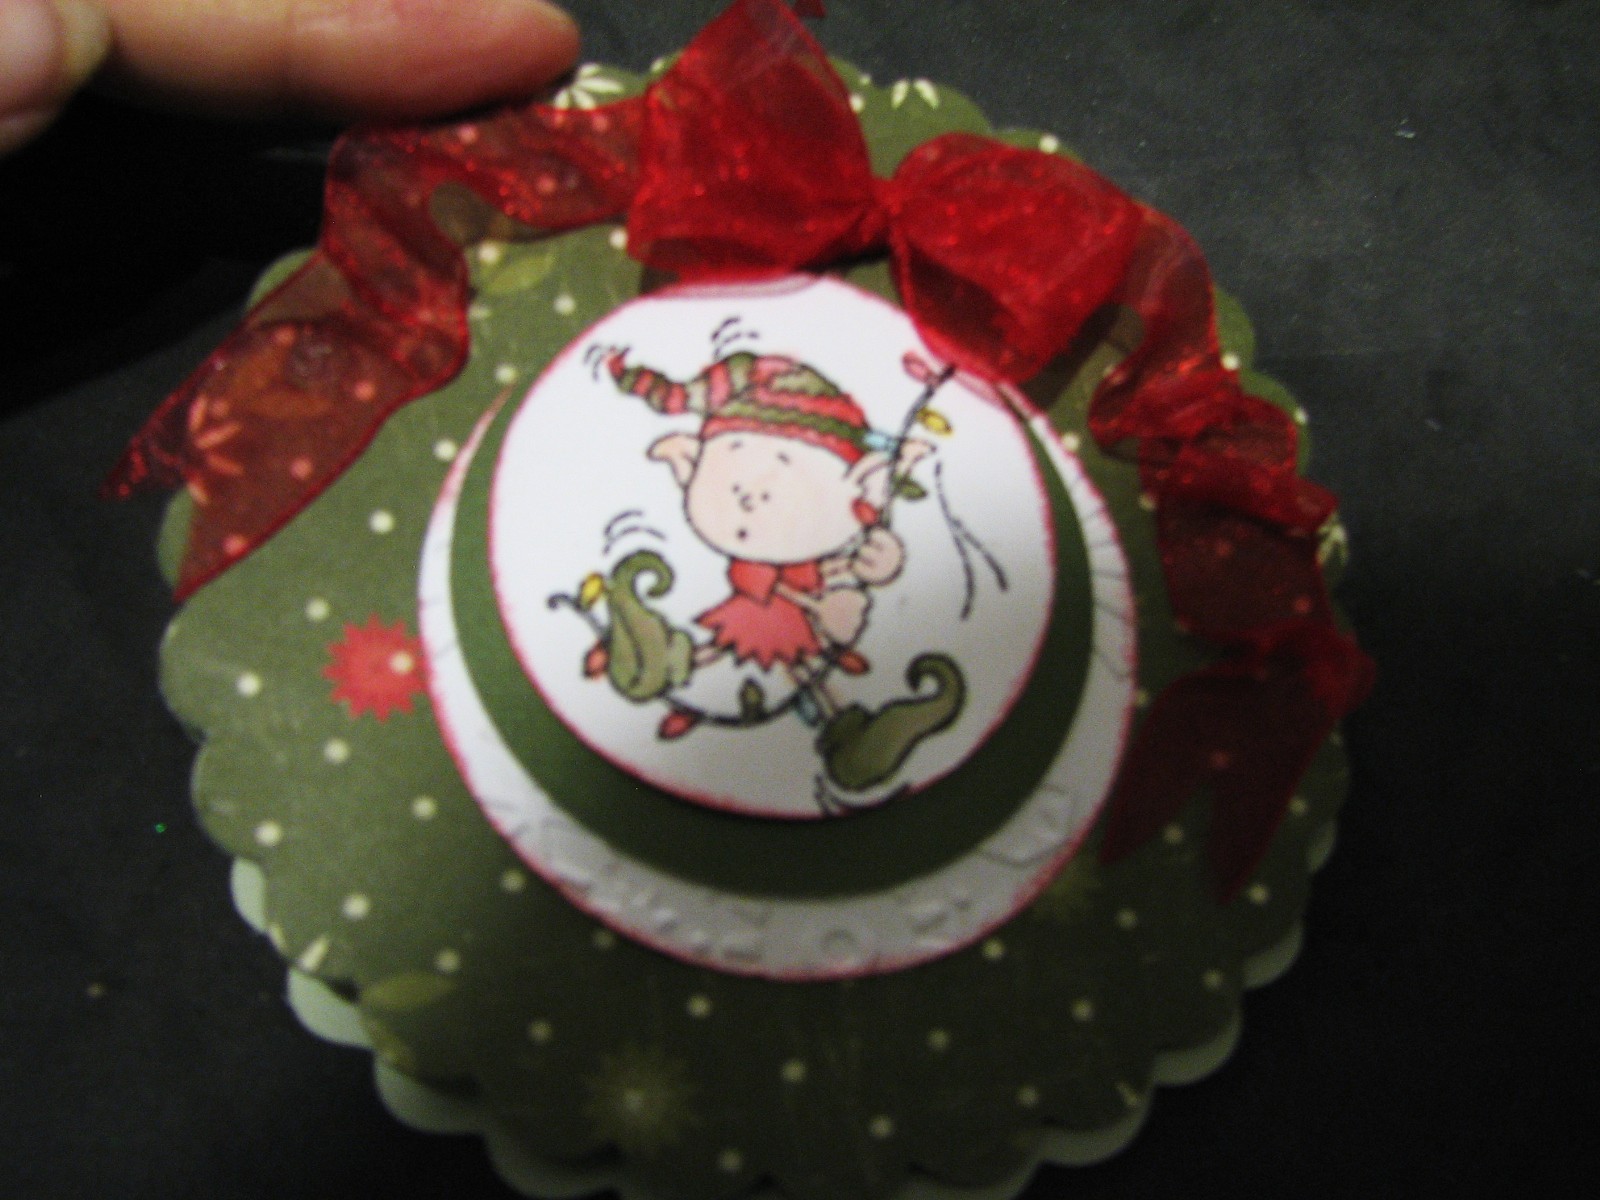
A copy of probably my favorite of all swap cards I have received. I received the original card from Nancy Brown, a very talented CTMH consultant, at the Orlando Convention in 2008. Duplicate as nearly as possible, I couldn't find a thing I didn't just love about it. Lots of techniques, including using a cuttlebug embossing template Swiss Dots, sanding the dry embossed lines, random stamping the background, embossing the center images in white daisy on Ocean cardstock then cutting them out. Her very clever way of arranging the cardstocks and you'll want to click on the image to enlarge it so you can see the faux brads, which are actually just small hole punches that are filled with liquid glass. How cool is that? This was one of the cards my ladies learned to make at my last Hostess Club meeting along with 2 of Treasures cards below. If you want to learn how you too can join my Hostess Club just give me a call. Maybe you know a few friends that would like to learn great new techniques every month, I would love to start a new hostess club just for you.

Wednesday, August 5, 2009

Cuttlebug meets CTMH


Here are some cards I did last month playing with my Cuttlebug folders and CTMH papers and stamps. I love the look of dry embossing and enjoy creating using some advanced techniques to get the embossing just where I want it and leaving blank unembossed areas for stamping. Give me a call and we can set a date for some one on one free classes if you're interested.
The blush card above shows how wonderful the dry embossing stands out when lightly sanded to make the images pop.


Simple sometimes says it best. This beautiful font teamed with dry embossing on a white card with just a hint of sparkle sets off the scalloped edge on the blue liner.

Swiss dots and a border folder combine with blush cardstock and ribbon

to make a sweet thank you card. I just love these two folders used together.


Can you tell I'm loving the color blush, must be thinking about my girls as Shannon just had a birthday and Sara has one coming up. Can there be anything more feminine than swiss dots? Teamed up with a border punch from Fiskers, this is simple, quick and just makes you smile.