Tuesday, February 21, 2012

February Hostess Cards


I almost never gravitate to yellows, maybe because it's just not a great color on me,so when I decided to come up with a couple of cards for my monthly hostess club ladies, I challenged myself to use yellows. Buttercup met honey and my yellow monochromatic butterfly card was done. A cuttlebug embossing folder was used on the first buttercup layer to give another dimension, then a layer of honey for contrast, a pinstriped embossed buttercup which we made scoring every line on a Martha Stewart scoring pad ( you could also use your stylus and 12" fiskar trimmer). Our beautiful lacy butterflies were cut using the AP Cricut cartridge in Honey and popped up in the center using foam tape and accented with 3 white pearls. A simple white bow finishes the card. I like to sometimes not include a sentiment so that I have cards on hand that I can personalize as I need them.

The new Card Word Puzzle is such a fun stamp set and I just love the Rose image that is part of this set. Our next card uses a heat embossing technique that is so much fun. We started out with white cardstock and stamped the rose image three times on the white with versamark, then we sprinkled the versamark image with clear detail embossing powder and heat embossed it. Using a sponge and Grey Wool ink we worked the grey wool ink over the entire white cardstock in a circular motion. Then a phrase was stamped in black surrounded by a frame cut with the AP Cricut cartridge in black cs accented with small white pearls. This layer was mounted on buttercup, then black and finally the base white card. I didn't take a picture but a single grey wool rose is stamped inside the card as well.


Thursday, February 9, 2012

Wedding Layouts in StudioJ

The Bride and Groom were beautiful, the day was perfect, the venue spectactular, the food delicious, the music devine, the family and friends heartwarming, what more can I say.....My little girl got married.


.
Thanks to StudioJ, I was able using the Olivia kit to complete all of these layouts in a single day, now it took me awhile to start them, cause I am the master of procrastination, but once started it was quick and easy and I think they turned out great, coordinated but each one an individual.
Take advantage of the February special and you could be enjoying 10 2-page layouts of your own for the price of 5. This month is buy one 5 layout pack and get another 5 layout pack for Free, plus free page protectors and free shipping. Wow what are you waiting for. Go to my website and just above the image you will find a "try it out" link. You can upload your own photos and design your own layouts in minutes Free, you only pay for them once you are satisfied that they are right for you.

Wednesday, February 8, 2012

Five for Free

Five for Free!

Buy a Studio J® 5-pack, get one 5-pack free!

Here is one of mine that I just love, with my two littlest grandsons. Jackson and I started our family tradition of making a Gingerbread House and this year little Joshua joined us. What a fun time and a fun layout that took me only minutes to put together. Drag and drop couldn't be easier and now with this great special even more affordable to get those memories out of the camera and into your scrapbooks for all to enjoy for years to come. I even ordered duplicates for their Mom and Dad so they would have a copy too.
What great shots they got when they had their photo shoot with good friends and the only Mr. and Mrs. Claus the boys have ever known. A terrific couple with hearts as big as the characters they portray.

You can try Studio J for free with no obligation. Just go to my website www.ctmh.com/janeo and follow the link on the side to StudioJ. You never purchase a layout until you are satisfied with it and you can design your layouts for free. So give it try and then take advantage of this great special before the end of February and save money as well as time.

Double your layouts with our Five for Free promotion! For each Studio J® 5-pack you purchase this February, you’ll get one free 5-pack. That means you get 10 layouts for just $55—that’s just $2.75 per page, with free shipping!

Studio J 5-packs include everything you need to have 5 two-page layouts (that’s 10 scrapbook pages!) shipped to your door ready for your scrapbook album. Each 5-pack can be redeemed for:

•5 two-page layouts

•5 Memory Protectors®

•Free shipping and handling

Whether you’re looking for an affordable gift or a way to save money on your own layouts, Studio J 5-packs offer you convenience and savings. Even if you’re already taking advantage of Studio J’s incredibly low members-only pricing, you’ll save even more when you purchase 5-packs through this special February deal. Keep one for yourself and give one as a gift!


Offer valid February 1–29, 2012. Unredeemed 5-pack codes have no cash value and may not be applied toward any other product purchase. 5-packs are redeemable only once. If the user orders fewer than 5 two-page layouts, remaining layouts are forfeited. See studioj.com/studioj_termsconditions.html for full terms and conditions. Tax may apply.

Monday, February 6, 2012

AP Folded Hearts Canvas

Getting ready for a  minor bathroom redo  (remove wallpaper and paint) and wanted to start making some artwork for the newly painted walls to give it a fresh look. I love Indian Corn Blue cardstock by CTMH and  couldn't wait to use it on this 16x20 flat canvas that I got at "M" the other day. Each flower is made up of 7 hearts. You can arrange them however your eye likes. For this canvas I cut the hearts using the AP cricut cartridge(order here) Heart<1> p. 26 Shift. 7 @ 2 1/2", 14 @ 2", 7 @ 1 1/2", 14 @ 1 1/4", 10 @ 1", 17 @ 3/4", 14 @ 1/2".Fold each heart in half and adhere the folded heart in a flower shape with Liquid Glass. Make a few extra hearts of each size in case you make a mistake putting the petals on the canvas. (Guess how I know that). It doesn't matter that the petals of all the flowers are going the same direction, but it does matter that all the petals in the same flower are going in the same direction. I found the easiest way to decide on placement was laying it out on a second canvas and adhering the flowers one by one while judging my placement.

Tuesday, January 31, 2012

Burlap and thrift store frames

Just wanted to share a couple of other burlap projects that I just finished up. I am so excited with how these turned out and think my girls are going to love them. I have so many neat things that I have found on Pinterest and that my beautiful daughters have pinned, that I know I will never have time to finish them all, but I'm working on it. This one comes from Tonya here. I have always loved shopping for Thrift Store treasures and when looking for just the right frames that's where I headed.
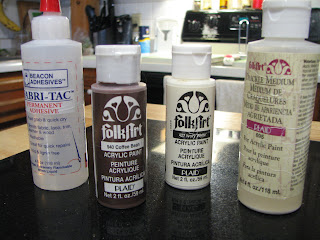
This oval frame was just a couple of dollars but had seen some better days, and the dated floral image inside it was not cutting it. So I roughed it up with some sandpaper and several coats of white spray paint later it is looking clean and very cool. I purchase the large letter N from Michael's and painted it first with brown paint
let it dry thoroughly and then put a Crackle Medium over the brown. Once that was completely dry I added a top coat of ivory paint and the magic happens and your top coat crackles and lets some of the brown undercoat show through. The picture that was originally in the frame was then covered with burlap and held in place on the back with Fabric Tac. Hubby helped me screw the N to the burlap to make sure it wasn't going to go anywhere once hung and voila, A new piece to hang in my little girl's home.
I have two wonderful daughters and while I was working on the one above for my youngest, decided to do one for my oldest daughter too. So using the same techniques, just a different thrift store find and black paint I came up with this one
The burlap flowers are not attached yet and I don't know if she will want them on there or not. What do you think, flowers or no? Should I make it 3 flowers instead of 2?

Sunday, January 29, 2012

Printing on Burlap

(Click on picture)
This is such an awesome technique that I just had to try it last night and show it to you. Yes you can use your regular inkjet printer to print on Burlap and it didn't hurt my printer a bit. Now I have to admit that I was nervous at first, I mean stick burlap that rough, stringy fabric that ravels as you look at it in my printer and not expect it to be a gummy mess, with the burlap wrapped around everything it touched inside my printer. Yeah right. Well I learned of this on pinterest and if you haven't caught the pinterest bug and you love to craft, like I do, all kinds of crafts, then leave a comment and I'll send you an invitation and your life will never be the same again. Please check out this wonderful blog and read all the comments and you will see tons of people that tried this following Maryannne's directions on domestically-speaking. and you will know why I was brave enough to give this a try. Well I have to tell you it was so easy and worked like a dream that I will be doing this a lot more. The possibilities are endless. I have renewed my love of burlap and will be posting more creations soon.
The basis of this technique is to iron your burlap well and make sure it is as wrinkle free as can be. Then using a dry medium hot iron take a piece of freezer paper, yep freezer paper the kind that is plastic on one side, my was from Reynolds and I got it at the grocery store where they sell all the other wraps, like waxed paper, aluminum foil etc, and put the plastic side down (shiny side down) on the burlap and iron them together. The plastic will stick to the burlap like magic.Make sure that all the edges are ironed down and bonded well. I made sure that my freezer paper was cut to 8.5x11 to fit my printer and that the burlap was maybe a 1/4 inch smaller all the way around. You now have your one piece burlap paper and can print anything on the burlap, words, pictures, graphics etc. I created some subway art at another great website for free, then printed out my finished project, and framed it in a  11x16 frame with a mat opening of 8x10. I love it and I know that my daughter who this was designed for will love it too. I'd love to know what you think.
( disclaimer I will not be responsible for any damage to your printers, if you are worried about it jamming your printer, I would suggest getting an inexpensive printer, maybe even  from a thrift shop, to try this. I will tell you again that my HP printer handled this beautifully)

Tuesday, January 17, 2012

Cards for my Hostess Club tonight

My hostess club didn't meet in December so this is our first get together in the New Year so I wanted to make so cards and a 3D project they can use for Valentine's or whenever. We don't usually stamp a sentiment on the inside so that they can use them for a variety of occasions, and just stamp whatever the occasion or leave blank and write a nice long note. The first one has an old world feel and could be used for Valentine, Birthday, Thank You or even a Sympathy card.
Veranda papers, juniper and colonial white cardstock, cuttlebug embossing folder, Flutter Just blooms, Opaque Pearls, crocheted ribbon combine to make this card. All papers and the butterfly were distressed with chocolate ink. The juniper cardstock piece uses the technique faux stitching which I learned from a very talented CTMH consultant Tresa Black on her website, you can visit her here.
The next card is a little more whimsical and all the cutting was done using the Art Philosophy card.
The little envelope was cut at 1" using the Font Layer/Shift on page 30 and the mini hearts popping out of the envelope were cut at 1/2' in cotton candy and cranberry.
Last but not least is our little 3D project. These cute little owls were again all cut using the Art Philosophy. They are pillow boxes cut @ 5 1/4" using the image on page 28. Were are going to fill them with candy but you could use so many other things. We are doing 3 different colors and I'll post a picture of the ladies creations after they are done tonight so you can see the different colors.

The large white circles are cut 1 3/4 inches, long oval 2 cut @ 1" for wings, Black eyes and the printed body circles are @ 1 1/4", you need 12 body ones and 2 eyes. the feet and the beak were the bottom and top part of the Heart2 cut @ 2" page 39. All of the products except the google eyes are CTMH.
Hope you like these, I love to read what you think, my ladies should be here in 10 minutes, I'll post their finished pics later.
Wow we had a great night, it was so nice to see everyone again. They all did a great job and changed the cards up a little with their individual creativity. Here is a picture of their little owls, didn't they all come out cute, I love how each one has it's own personality just by changing their eyes.