Tuesday, January 31, 2012

Burlap and thrift store frames

Just wanted to share a couple of other burlap projects that I just finished up. I am so excited with how these turned out and think my girls are going to love them. I have so many neat things that I have found on Pinterest and that my beautiful daughters have pinned, that I know I will never have time to finish them all, but I'm working on it. This one comes from Tonya here. I have always loved shopping for Thrift Store treasures and when looking for just the right frames that's where I headed.
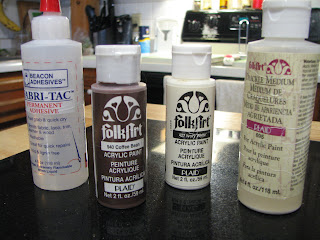
This oval frame was just a couple of dollars but had seen some better days, and the dated floral image inside it was not cutting it. So I roughed it up with some sandpaper and several coats of white spray paint later it is looking clean and very cool. I purchase the large letter N from Michael's and painted it first with brown paint
let it dry thoroughly and then put a Crackle Medium over the brown. Once that was completely dry I added a top coat of ivory paint and the magic happens and your top coat crackles and lets some of the brown undercoat show through. The picture that was originally in the frame was then covered with burlap and held in place on the back with Fabric Tac. Hubby helped me screw the N to the burlap to make sure it wasn't going to go anywhere once hung and voila, A new piece to hang in my little girl's home.
I have two wonderful daughters and while I was working on the one above for my youngest, decided to do one for my oldest daughter too. So using the same techniques, just a different thrift store find and black paint I came up with this one
The burlap flowers are not attached yet and I don't know if she will want them on there or not. What do you think, flowers or no? Should I make it 3 flowers instead of 2?
Sunday, January 29, 2012

Printing on Burlap

(Click on picture)
This is such an awesome technique that I just had to try it last night and show it to you. Yes you can use your regular inkjet printer to print on Burlap and it didn't hurt my printer a bit. Now I have to admit that I was nervous at first, I mean stick burlap that rough, stringy fabric that ravels as you look at it in my printer and not expect it to be a gummy mess, with the burlap wrapped around everything it touched inside my printer. Yeah right. Well I learned of this on pinterest and if you haven't caught the pinterest bug and you love to craft, like I do, all kinds of crafts, then leave a comment and I'll send you an invitation and your life will never be the same again. Please check out this wonderful blog and read all the comments and you will see tons of people that tried this following Maryannne's directions on domestically-speaking. and you will know why I was brave enough to give this a try. Well I have to tell you it was so easy and worked like a dream that I will be doing this a lot more. The possibilities are endless. I have renewed my love of burlap and will be posting more creations soon.
The basis of this technique is to iron your burlap well and make sure it is as wrinkle free as can be. Then using a dry medium hot iron take a piece of freezer paper, yep freezer paper the kind that is plastic on one side, my was from Reynolds and I got it at the grocery store where they sell all the other wraps, like waxed paper, aluminum foil etc, and put the plastic side down (shiny side down) on the burlap and iron them together. The plastic will stick to the burlap like magic.Make sure that all the edges are ironed down and bonded well. I made sure that my freezer paper was cut to 8.5x11 to fit my printer and that the burlap was maybe a 1/4 inch smaller all the way around. You now have your one piece burlap paper and can print anything on the burlap, words, pictures, graphics etc. I created some subway art at another great website for free, then printed out my finished project, and framed it in a  11x16 frame with a mat opening of 8x10. I love it and I know that my daughter who this was designed for will love it too. I'd love to know what you think.
( disclaimer I will not be responsible for any damage to your printers, if you are worried about it jamming your printer, I would suggest getting an inexpensive printer, maybe even  from a thrift shop, to try this. I will tell you again that my HP printer handled this beautifully)

Tuesday, January 17, 2012

Cards for my Hostess Club tonight

My hostess club didn't meet in December so this is our first get together in the New Year so I wanted to make so cards and a 3D project they can use for Valentine's or whenever. We don't usually stamp a sentiment on the inside so that they can use them for a variety of occasions, and just stamp whatever the occasion or leave blank and write a nice long note. The first one has an old world feel and could be used for Valentine, Birthday, Thank You or even a Sympathy card.
Veranda papers, juniper and colonial white cardstock, cuttlebug embossing folder, Flutter Just blooms, Opaque Pearls, crocheted ribbon combine to make this card. All papers and the butterfly were distressed with chocolate ink. The juniper cardstock piece uses the technique faux stitching which I learned from a very talented CTMH consultant Tresa Black on her website, you can visit her here.
The next card is a little more whimsical and all the cutting was done using the Art Philosophy card.
The little envelope was cut at 1" using the Font Layer/Shift on page 30 and the mini hearts popping out of the envelope were cut at 1/2' in cotton candy and cranberry.
Last but not least is our little 3D project. These cute little owls were again all cut using the Art Philosophy. They are pillow boxes cut @ 5 1/4" using the image on page 28. Were are going to fill them with candy but you could use so many other things. We are doing 3 different colors and I'll post a picture of the ladies creations after they are done tonight so you can see the different colors.

The large white circles are cut 1 3/4 inches, long oval 2 cut @ 1" for wings, Black eyes and the printed body circles are @ 1 1/4", you need 12 body ones and 2 eyes. the feet and the beak were the bottom and top part of the Heart2 cut @ 2" page 39. All of the products except the google eyes are CTMH.
Hope you like these, I love to read what you think, my ladies should be here in 10 minutes, I'll post their finished pics later.
Wow we had a great night, it was so nice to see everyone again. They all did a great job and changed the cards up a little with their individual creativity. Here is a picture of their little owls, didn't they all come out cute, I love how each one has it's own personality just by changing their eyes.

Sunday, January 15, 2012

Please check out these images of retiring products that another consultant shared. Don't miss out on the chance to order these great products before they are gone forever on Jan. 31, 2012.
To place an order just give me a call at 757-646-8302 or go to shop online at www.ctmh.com/janeo.