Sunday, August 14, 2011

For Jackson

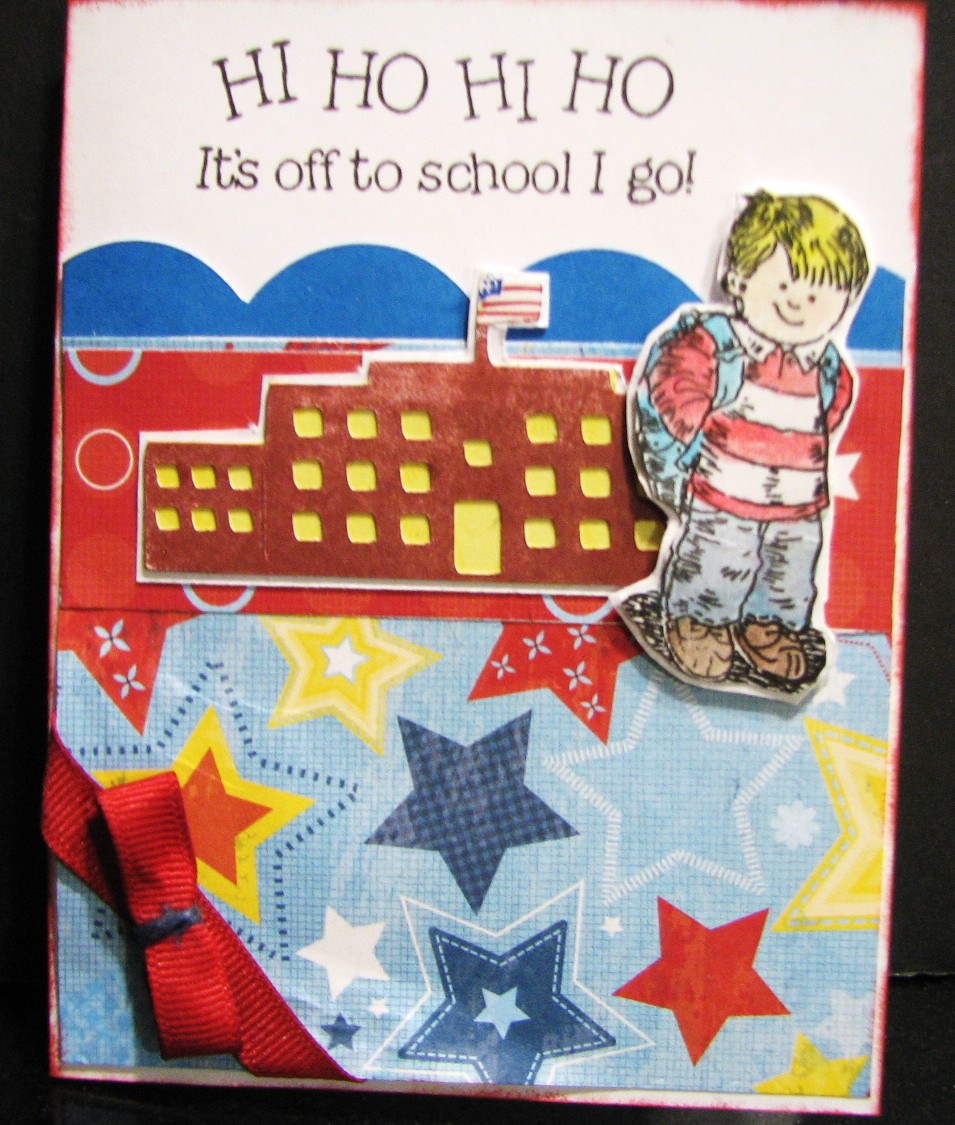
Jackson is my 5 year old grandson, and one of my favorite people. Oh don't get me wrong, I have 4 other equally favorite other grandsons, but this card in not for them. Jackson is going to be going off to big boy school ....kindergarten starting in early September. He will be attending school all day, starting a journey that I hope he will love, learn and laugh through for the next 18 or so years. When CTMH came out with this stamp set, School Zone several years ago,  I knew I had to get it and  I knew I would use it to make Jackson a card...so this one is for him. I won't be there when he starts his new journey but I know my card will be and I know he will be thinking of me when he looks at it.
The new Card Pattern this week was just what I needed to encourage me to make it well ahead of time, so I make sure it gets to him on time. I'm somewhat of a procrastinator and usually leave everything to the last moment, a trait that drives my (have to have it done early) hubby crazy.
CTMH Fanfare Level 2 paper pack X7138B, School Zone, Cricut Art Philosophy, Cricut My World, Black, Barn Red, Star Spangled Blue, brayer, water brush watercolor crayons, cranberry grosgrain ribbon.
Cut the scalloped border using the Art Philosophy cricut cartridge and colored with Star Spangled blue ink and brayer, school building cut from My World cricut cartridge and colored with Barn Red and brayer. One of my favorite ways to experiment with different colors is to cut the images in white daisy and use the brayer to color the cardstock instead of having to load numerous colors of cardstock into the cricut and I can cut everything without having to load and unload. Colored my little boy with water brush and watercolored crayons that I got a craft store. I've had them for ages and don't remember which store it was. The little boy is popped up on the card with foam adhesive. I stamped the inside and left room for a personal note for my not so little anymore grandson. Hope Jackson and you all like it.

Friday, August 12, 2011

Two of my Favorite Things, and they are both embossed

I can't think of any technique which say Wow like embossing. Whether you are using embossing powder and a heat gun to give your stamped image that shine and pizazz that pops off the cardstock or the deep impressions you get using a dry embossing template, nothing attracts more attention, making the simplest of designs extra special. Here are some examples of both types. Shiny Black butterflies colored with inks and a water brush, jump off the card where white embossed  simple flowers form the background of the card. Click on an image to see more detail.

The stamp set used on the blue card is Treasure Life D1306 for the flowers, I believe the butterfly is retired.

My personal favorite is the look of dry embossing which is easily obtained by using your embossing templates and your sizzix or cuttlebug machine. I think I could add embossing to just about every project and it wouldn't be too much. The texture is something special and adds the Wow factor to plain white cardstock like nothing else does.
White Daisy cardstock and black ink stamped between two sections of dry embossing using the Dotted Swiss cuttlebug embossing template. Stamp set is Captured Moments C 1423. Another example of this stamp set (one of my favorites) is in the next card. I believe that the embossing template is Branches by cuttlebug, the paper is some old retired CTMH and the image is stamped in Chocolate and color added by CTMH markers in fall colors.

Another great technique with the dry embossing is to emboss on colored cardstock, and CTMH has the perfect white core colored cardstock for the technique. Simple dry emboss using the dotted swiss cuttlebug folder, and sand lightly exposing the white core and the embossing pops off the cardstock. Each layer was dry embossed on this last card and I love the effect. Stamps from The Present D1436.

Thursday, August 11, 2011

CTMH August Stamp of the Month

Close To My Heart has a new Stamp of the Month policy that makes it easy for you to enjoy the exclusive stamp at a huge discount. Each month you can enjoy a new D size stamp set, available for one month only, for just $5.00 - that's 72% off the full retail price. Just place an order for $50 or more in CTMH products, you'll get the Stamp of the Month for $5. You can also purchase the Stamp of the Month at full retail or $17.95 with no minimum purchase required.
But that's not all, this month when you purchase $50 or more and the August Stamp of the Month, you will also received the My Acrylix A size stamp Typeface for FREE.
Wow that's a great deal, but it gets better. If you spend $75 or more between August 15 and August 31 you will qualify to receive CTMH's 1st ever double stamp set, Pair-a-Phase for FREE as well. 

I'll be posting some special artwork done with these great stamps soon, so come back and check them out.

My first Sketch Challenge

A big thank you to Carol Lee of caroldlee.blogspot.com for turning me onto the cardpatterns.blogspot.com. I fell in love with this current sketch and knew it was perfect to showcase the new Art Philosophy cricut cartridge sold by CTMH. Here is the stetch.
I pulled out my Dreaming level 2 paper X7142B and cut a 4x4, some White Daisy CS and my terrific Art Philosophy cartridge and started to create. First I cut a Doilys using the one on pg. 68 with the FlurDel at 3 1/2 inches, then I pulled out some retired ribbon Twilight and mounted it on the doily with glue dots. I absolutely love sunflowers and made mine by cutting the flower on page 21 2 @ 1 1/2  and 1 @ 1 1/4 for the large flower, and 2@ 1 1/4 and 1@ 1 inch for each of the small flowers using white daisy cardstock. Yep you read that right, white daisy. I love to color the flowers once I cut them out and find I can do a lot of cuts, sometimes filling a mat with images. Once they are cut out I just used my Sunflower Ink and my brayer to add the color to the white cardstock. I layered the 2 larger cutouts, staggered on each other, then the slightly smaller one again staggered. I cut out 3 circles from page 21 @ 1/2 inch from some retired chocolate textured cs and used my piercing tool and mat to make the center textured. I repeated this for the 2 smaller flowers. The leaves were again cut out of white daisy cs, using the  @ 1 1/2" and colored with brayer and Olive ink.
Mounted on 4 1/4 by 4 1/4 inch retired chocolate textured cardstock. Stamped the sentiment in Chocolate in from the Card Chatter Sympathy D1476. I really liked the way the card turned out, but realized I'm not much of a square type of person. I've never been into checks, I'm more of a pokadot person, or stripes, so rectangles are more appealing to me, so I added the original square 4 1/4x 4 1/4 card front to a 5 1/2x4 1/4 standard size card and a couple of the flourishes from the August Stamp of the Month, Wicked S1108, in chocolate ink and came up with my finished card.
Which do you prefer, the square or the rectangle?  Here's another example of the great Dreaming Paper pack and some wonderful Art Philosophy images.

Wednesday, August 10, 2011

Walk for a Cure

This is for my littlest grandson, who turned 2 on Feb. 28, 2011. My daughter posted this and I wanted to support them by re-posting on my blog. Thank you for anything you can do, walk with us, contribute to JDRF, say a prayer for Brian, Joshua and all those affected with Diabetes.


Did you know Type 1 Diabetes can strike at any age for no reason. Type 1 Diabetes is an autoimmune disease in which a person's own body (white blood cells) attack the insulin producing cells (beta cells) in the Pancreas. Due to the subsequent lack of insulin, the cells are unable to use sugars for fuel. Therefore the body begins to starve and will subsequently breakdown fats and proteins for fuel. The by-product of this breakdown is called "ketones". Ketones can make one very ill and can cause death if not dealt with.


Brian, my husband, was diagnosed with Type 1 Diabetes in his late 20's. He did nothing to cause this to happen. His body just started fighting itself. We dealt with it. The highs the lows, the finger pricks and testing. This is just what God wants us to to deal with we decided. But then in 2010 that all changed. In Feb 2010 Joshua was only 11 months old when diabetes almost took his life. We didn't know it but his body had begun to fight against itself. When Joshua went to the hospital we were told he had made it just in time. his body had already begun the "shut down" process and he was in severe DKA. (Diabetic ketoacidosis). They said it was just a matter of a few hours. Joshua's initial BG test was 1240. (his normal range should be between 100-200). After several days in the PICU and then on the Diabetes floor. Joshua came home. he is now a lively 2 year old boy who loves to play and run and bounce. The difference is that Joshua's body is going to forever fight against itself. Joshua receives app. 10 blood checks a day including over night, from his tiny fingers or toes. Everything he eats or drinks must be weighed or calculated and then a shot is given with life saving insulin. Everyday Joshua battles highs and lows which cause him to feel miserable and can lead to deadly consequences.

We are so thankful to live in a country where we can have access to the medicine we need to keep him alive but Insulin, is not a cure. We are lucky that when the time is right for Joshua we can gain access to a pump for his insulin to help reduce the number of shots he gets a day, but again this is not a cure. A cure will mean that he can be free, free to do what every other little boy does and not be worried about running to much or not enough. Free to get an ice cream cone with out the calculations and risks of high or low blood sugars. Free to sleep an entire night with out being woken by a needle prick. Free to know that no other children will experience what he has in his life. Free to say I used to have Type 1 Diabetes. Then and only then will we have a cure.

Here is how you can help:

1) You can join our Family Team known as "Joshua's Rock Stars," which consists of family and friends who donate and/or collect pledges and walk with us in support of Brian and Joshua. Please contact Shannon at shannondaviscmc@gmail.com or go to JDRF.org to register. We are hoping to have Rock Stars T-shirts for all walkers. Please let me know if you are planning on walking and t-shirt sizes by Monday,September 5, 2011. The WALK is on Saturday October 22, 2011 at the Virginia Beach Ocean Front.

2) You can send our family a tax-deductible contribution made payable to "JDRF" or donate online right HERE. Any amount is OK ...every $5, $10, and $20 helps to fund less laborious treatment regimens and hopefully ... ultimately ... A CURE.

3) You can share this site with family and friends.

WONT you help us. Join our walk team, raise money along side of us. Spend the day with us on 10/22 to help find a CURE for Type 1 diabetes.

THANK YOU!

With love - Brian and Shannon Davis

Tuesday, August 9, 2011

CTMH Art Philosophy cricut images

This is just a smidgen of the cuts that you can make with this wonderful new cartridge, a Close To My Heart exclusive. Check out all the different images that you can cut and just imagine with all the sizes available on your cricut the possibilities. Click on any photo to enlarge it.


So many tages, flowers, 3 D flowers, boxes, cards and envelopes, borders and accent pieces. I'd love to show you this cartridge in person, just give me a call. You can purchase this cartridge along with the 3 coordinating stamp sets and the chipboard elements created to go hand and hand with this cartridge. Purchase during August and you can purchase the August Stamp of the Month for only $5 and also receive the A size stamp Type Set for Free. check it out at http://www.janeo.myctmh.com/.

CTMH Scallop Punch

CTMH scallop punch, Z1392, is so easy to use and is one of the most versatile accessories to add that something extra to your cards, scrapbooking and paper crafts. Thanks to an extremely talented Close To My Heart consultant Brenda Freichs and her Stamp, Scrap, Create blog posts and tutorials, I was able to put together this display board to teach my Hostess Club some great flowers that can be created with this scalloped punch and a few snips here and there.

Just click on the above board to see a larger view.
Cut in and removed every other scallop as shown in the white punched circle shown to the right of the card. Layer two or more prepared scalloped circles, off set from each other and enhanced with ink..

Two scalloped circle flowers created by cutting between every two scalloped, stacked and paired up with an embossing folder, makes a simple but fun card for many occasions.