Here are a couple of cute cards to make for Easter/Spring.
Here are a couple of cute cards to make for Easter/Spring.
Both of these cards uses the Art Philosophy Cricut cartridge and cuttlebug folders, two of my favorite things for creating. The Bunnies were created cutting Petal2 shape, p59 @ 1 1/2 inches for ears in white, you need 4, and 4 @ 1 inch in pink( mine were watermelon CTMH). Heads were circle shape on p 21 cut @ 1 1/4 need 2, and butt @ 1 1/4 need 1 in white. Muzzle was same circle cut 1/2 inch need 4, for the white eyes I changed my expression to cut in 10ths and use .40 as the cutting size, need 4. Pink nose was cut @ 1/4 inch need 2. Feet were cut from the egg shape 9 p 57 @ 1 inch and so were the Easter eggs hidden in the grass. Black eyes were punched with a 1/4 hole punch. The frame for the sentiment was cut from Shape3 p 46, Decorative layer @ 1 inch. I cut a strip of New England Ivy patterned paper from my stash and used scissors to fringe the grass. The top cardstock was embossed with the Swiss Dot cuttlebug embossing template and sanded to make the dots pop. I popped the face off the ears, the muzzle off the face and the nose off the muzzle. I glitter glued pink the nose and inside the ears to give some sparkle and because who doesn't love glitter. A simple bow and some tiny pearls finishes the card.
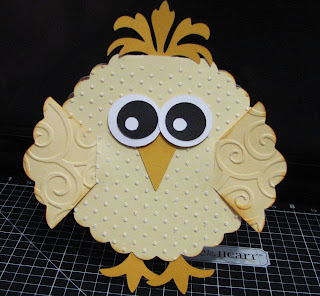
Chick Card
Buttercup and Honey are the CTMH colors used on this card. AP cricut cuts are:
1 Circle2 card p 31 @ 4 inches, 2 Tab2 font layer p58 @ 1 3/4 for wings, 1 Oval2 accent p. 32 @ 2 inches for top of head, 2 Oval 2 accents p 32 @ 2 1/2 inches for feet, 1 Banner4 p49 @ 1 1/4 for beak, 2 Circle p21 @ 1 inch for white eyes, @ 3/4 for black eyes, @ 1/4 for eyes centers. Inside I cut another circle 2 card in a coordinating patterned paper p31 @ 3 3/4.
Assembly: Emboss card front with Swiss Dots folder, emboss wings with swirls folder. Ink edges in honey. Measure where you want wings and slit front of card to tuck in back of wings. Adhere to inside of card, dimensional tape under wings on front to pop off card at wing base. Assemble eyes with circles Attach beak and eyes, pop dot eyes. Trim 2" oval accent piece by cutting in center and use top half for feathers at top ( there is a small slit in the top of the card base which the cricut makes when you cut out the card, the base of the feathers will fit into that slit) adhere to inside of card. Cut both of the 2 1/2 inch oval accent pieces in half and use bottom half for the feet, removing the curly pieces on the side of the 3 center feet section. Adhere to inside of card. Adhere the patterned card to the inside of the card which will cover up almost all of the pieces where you adhered your pieces inside the card to give a finished look.
I hope you like these little guys, if you have any questions just let me know.
Happy Spring!


5 comments:
Oh my goodness, this little chick is adorable! I just love creative projects and crafting...so FUN! :)
I saw your work on your daughter Sara's blg, so I came over to see some more of your creations... Shannon and Sara have one TALENTED Mama... I love your creativity! Thanks for sharing it with the rest of us.
ooooops, that should say blog, not blg!
Very sweet!! So adorable. Joanie
Thank you do mcuh for the chick & bunnie. I'm going to have a ball with them.
Post a Comment