Showing posts with label Christmas. Show all posts

Sunday, December 4, 2011

It's beginning to look a lot like Christmas

I am convinced that I am truly in my second childhood. A couple of years ago, I finally gave in and bought a fake tree. I have to tell you as a real tree advocate, it was a big concession, but as the kids left the nest it was just one more way to minimize all the work hubby has to do to help me around the house and tree shopping and decorating and clean up were one of the issues he had with decorating for Christmas. Thank goodness that the kids have managed to get home for a least a portion of the holidays, or there would be no Christmas decorations to be found  here if Dad had anything to do with it. Well while the fake tree was pretty once set up, and yeah it was easier not to have to string lights and pick up pine needles, I just couldn't "love" it. So this year I saw this neat idea that someone pasted to facebook, and knew that this would be my new tree love. My theory is if I'm going to put up a fake tree, than don't hide the fact that it's fake, shout it from the tree tops. (click on any picture to get a closer look)
Isn't he fun? It makes me smile every time I see it. We searched high and low for just the right tree, but it was at second hand stores (I know over the years, I've seen a million and wondered why someone would buy a white tree), and at discount places like Big Lots. We tried KMart, and Target no luck, then we tried a little old fashioned box store called Roses and there it was for $25. We added a few strands of new lights with white cords, I elected to buy the one without the lights already attached, cause it was fuller and I don't mind stringing lights. Snowman's head was found at Big Lots ($6),

 the super dark blue glass bulbs at KMart for his buttons,

some really pretty garland to add to the fullness and make it shimmer like a fiber optic tree that really gives life to the branches.

I also found some really neat snowflakes at the dollar tree (6 to a card). A blue scarf that was gifted to us, and some pine branches from the yard for arms. So here you have him, I love him so much I may leave him up all winter. I would love to know what you think. Second childhood or just revolting against the green fake tree?

Sunday, November 20, 2011

I've been creating, just not posting, sorry

This has been a really crazy month for me. I went to visit my DD's family over Halloween, We had a great time, with the weather turning crisp and the leaves changing into a burst of autumn glory. She lives in a area that is totally natural and in the summer it is hard to find the sunshine, but oh how glorious it is in the fall. Had fun helping with Halloween costumes, attended both school and neighborhood festivials and did some shopping.
What I also did was come home with a nasty cold which flared up my COPD and my chronic broncities and landed me in bed for over a week when I got home.
So now to show you some of the projects that I've done with my crafting ladies that meet here once a month.
Love the easel cards and using Art Philosophy for all the cuts is so simple and easy. I told you I love red plaid and poinsettia, so you will see a theme to my Christmas creations this year. The Believe paper pack is just perfect and of course this is my favorite one in the pack.
Gold embossing the words, just as a pop of glam, don't you think?

Used my silver metallic cardstock and some outdoor denim cardstock and of course my favorite cartridge, AP fir te cuts. Then embossed some of the same silver cardstock with a cuttlebug folder that looked like swirly snow to complete the outside. I've got more to post and will try and get to them later today to try and get caught up. I've just started playing with my design studio software that I was unable to use due to computer conflict and I've been having a great time. Hope you all are having as much fun as I am.

Friday, October 14, 2011

Nature's Gift


I wish the pictures showed the shine that this card has in person. I used a silver metalic paper that I found at the office supply store. White Daisy pigment ink was applied to the bottom using a sponge in a wavy swipe from right to left. I then used Indian Corn blue the same way to do the sky. The silver shows thru in places giving a special shine. I also stippled on some White Daisy lightly and when completely dry, just barely added some petal for a touch of color. Stamped the tree, sentiment and bear in black. Outlined lightly the tree and the ground swirl with a puffy paint, let dry then heat set to puff up. Glitter glue was also added for extra dimension. The glitter glue even though it is clear, picks up the green color in the black ink and appears green in places.
Mounted on black and then on paper from Wonderland paper pack.

Thursday, October 13, 2011

Believe Paper Pack and AP Poinsettias


I just love the red plaid in the Believe paper pack and wanted to try a different card fold for this card. Cut a white 4 1/4"x 11 1/2 " piece of paper. Score at 2" from one end and 3 1/2" from other end. To make the poinsettia, I cut 2@ 3" Star Flowers from the AP cricut cardridge found on page 39 of the AP booklet, 1@ 1 1/2 "  in cranbery cardstock and 1@ 3/4" in olive.Turn the flowers over and score each petal  like a leaf. Turn back over the top and lightly sand exposing the veins in the petals. Highlight with cranberry ink. Stack the flowers on top of each other to form the flower, cut 2 leaves out of olive. I went around the edges with glitter glue to add some sparkle. The borders were cut with a Martha Stewart border punch using New England Ivy cardstock. I used 2  Shape2  on page 36 of the cricut booklet cut at 1 1/2 " for the sentiment on the outside and the inside lower flap. The inside center was cut in white using the Oval 5 cut @ 3 1/2. The words for the inside of the card come from one of the stamp sets that come in the Art Philosophy Cartridge bundle. If you haven't gotten yours yet, you can order one here.  I hope you enjoy this card, it was fun to make. Inspiration for this card design comes from Joanie http://craftingwithjoanie.blogspot.com/ make sure you visit her blog, you will not be disappointed.

Tuesday, September 27, 2011

Details on Poinsettias

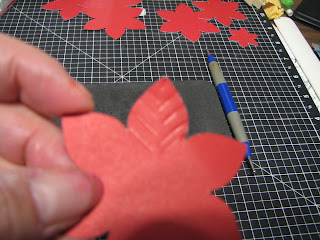
I have had a couple of questions about my poinsettia cards, yes they are cut from Art Philosophy the star flower on page 39 . I cut 2 and on studying some images of poinsettias, one of the characteristics is the vines on the individual lines of each petal, kind of like a leaf, so I turned the cut image over and used a stylus on my piercing mat to score lines like a leaf so they would be raised on the front.

wrong side
right side
 Then I used a sponge dauber with cranberry ink over the raised vines to really make them pop.


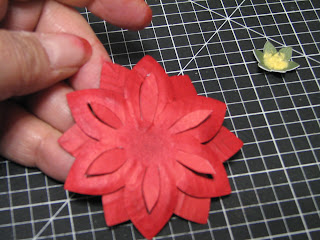
 I layered 2 flowers on top of each other off setting them, but on the top flower I also used a stylus on the opposite side to not only add the vines but went around the edge of each petal following the shape of the petal

 (It's hard to take a picture and hold the camera too, sorry it so blurry.)
and then when I flipped it over I used an exacto knife to cut the cut shape in the middle of each petal and popped it up a little.

 a very small star flower in green was cut for the center and I used my stylus around and round in the very center to cup up the center and filled it with the homemade yellow flowersoft. The leaves were the same star flower cut apart from New England Ivy same size and scored the same way, I sanded the right side lightly to bring the veining out and let the light core show thru.


Hope that helps, you can email me anytime if you need more help. ( Don't mind the red fingers, now you know why this blog is called "Doing it with Ink" , I seem to have ink on my fingers all the time). Have a great day

Monday, September 26, 2011

Starting early on Christmas this year

Ok well I guess those cute little pencils toppers got me thinking about doing my Christmas cards early this year. I wanted to share with you my favorite one that I made last year, put away in a safe place, then couldn't find it and thought I had actually sent it to someone without making a copy for my card book. Well I found it in it's safe place and photographed it for you.
Just click on the card to enlarge it and see more detail.
Simple, elegant, embossed lines with the scor pal and swiss dots cuttlebug embossing folder, embossed only in the middle of the card. Labels 4 nestabilities in the two largest sizes pop dotted to add dimension. Stamped the image from Snow Days C 1420 in black, then lightly went over the branches with brown watercolor pencil, the bridge was colored with grey, tree a light green and water light blue. I wanted everything muted and soft. The snow areas were covered with a homemade flower soft in white, that I made by grating some foam board with a very fine cheese grater. The sentiment is from the stamp set Captured Moments C1423. another one of my favorites. A couple of pearl adhesve gems finishes off the card. I hope you enjoy this one. Now I need to make another so I can send it off this year. I love the white on white with just the hint of color, don't you?