Tuesday, September 27, 2011

Details on Poinsettias

I have had a couple of questions about my poinsettia cards, yes they are cut from Art Philosophy the star flower on page 39 . I cut 2 and on studying some images of poinsettias, one of the characteristics is the vines on the individual lines of each petal, kind of like a leaf, so I turned the cut image over and used a stylus on my piercing mat to score lines like a leaf so they would be raised on the front.

wrong side
right side
 Then I used a sponge dauber with cranberry ink over the raised vines to really make them pop.


 I layered 2 flowers on top of each other off setting them, but on the top flower I also used a stylus on the opposite side to not only add the vines but went around the edge of each petal following the shape of the petal

 (It's hard to take a picture and hold the camera too, sorry it so blurry.)
and then when I flipped it over I used an exacto knife to cut the cut shape in the middle of each petal and popped it up a little.

 a very small star flower in green was cut for the center and I used my stylus around and round in the very center to cup up the center and filled it with the homemade yellow flowersoft. The leaves were the same star flower cut apart from New England Ivy same size and scored the same way, I sanded the right side lightly to bring the veining out and let the light core show thru.


Hope that helps, you can email me anytime if you need more help. ( Don't mind the red fingers, now you know why this blog is called "Doing it with Ink" , I seem to have ink on my fingers all the time). Have a great day

Monday, September 26, 2011

A Couple More Simple Christmas cards

Got this idea in my head for using the Art Philosophy cartridge to make some poinsettia flowers. Nothing says Christmas to me more than bright red poinsettias and I love red with bright white, like the white you get when you use our White Daisy cardstock, so here are a couple I came up with today to share with you.
The poinsettia was cut at 2 1/2" with the star flower in cranberry cardstock and I used the same flower for the leaves, simply cutting off the petals, and used New England Ivy. I used a stylus to score the lines for the leaves, then lightly sanded for definition. A stylus was used on the petals of the flowers to give some texture and top flower has a small petal shape cut in the center of each petal that is raised slightly. A small 3/4" star flower was cut in New England Ivy and a dot of glue holds down some homemade flowersoft, made by rolling a piece of non ctmh yellow cardstock and grating it with a very fine grater. The sentiment is a cuttlebug embossing folder and I scored a rectangle with 3 straight lines all around with a scor pal. These were both pop dotted and then adhered to a cuttlebug folder embossed card front.

Used cuttlebug embossing folders to do the top and bottom borders and the main image. Same poinsettia as the first one cut just a touch smaller at 2 1/4". Click on the pictures to enlarge and see detail closer. Let me know what you think of my poinsettias?

Starting early on Christmas this year

Ok well I guess those cute little pencils toppers got me thinking about doing my Christmas cards early this year. I wanted to share with you my favorite one that I made last year, put away in a safe place, then couldn't find it and thought I had actually sent it to someone without making a copy for my card book. Well I found it in it's safe place and photographed it for you.
Just click on the card to enlarge it and see more detail.
Simple, elegant, embossed lines with the scor pal and swiss dots cuttlebug embossing folder, embossed only in the middle of the card. Labels 4 nestabilities in the two largest sizes pop dotted to add dimension. Stamped the image from Snow Days C 1420 in black, then lightly went over the branches with brown watercolor pencil, the bridge was colored with grey, tree a light green and water light blue. I wanted everything muted and soft. The snow areas were covered with a homemade flower soft in white, that I made by grating some foam board with a very fine cheese grater. The sentiment is from the stamp set Captured Moments C1423. another one of my favorites. A couple of pearl adhesve gems finishes off the card. I hope you enjoy this one. Now I need to make another so I can send it off this year. I love the white on white with just the hint of color, don't you?

Sunday, September 25, 2011

Merry Pursuits Round Scalloped Easel Card


Surprise I'm also a gift card holder, the perfect size to tuck that wonderful gift for your special someone.
The cuts are so easy with the Art Philosophy cartridge, everything lines up so perfectly and are so crisp and perfect. The card base is cut out of retired Textured New England Ivy cardstock using the card feature on page 31 and cut at 4 1/4 inch. This will fit nicely in a standard size envelope for mailing. You will also need 1 page 31 cut at 4 1/4 for the top of the card from cardstock and 1 of the same size cut from Background and Texture paper or patterned paper of your choice. I used some retired CTMH paper that I had on hand. You will need to also use the regular circle found on page 21 and cut (1) at 2" in white, (1) at 2 1/4" in New England Ivy and (1) at 2 1/2 in white (which I embossed with a cuttlebug folder), (1) at 3" in New England Ivy and (1) at 3" in Background and Textured paper. I used the red side of the B&T.
.  
Fold the TOP of the card base in half and fold back on itself.
Adhere the Background and Textured 4 1/4" scalloped circle to the 4 1/4" New England Ivy scalloped circle matching the scalloped, so easy since they are identical cuts.

Stamp your image on the 2" white circle, I used one of the little elves from Merry Persuits B1313 and colored him with a waterbrush and ink from the top of the stamp pads. I embossed the larger white circle using a cuttlebug folders with snowflakes, then glued the 2" onto the 2 1/4", then onto the embossed 2 1/2 circle These were glued off center with upper right edges lining up. Then this unit was glued to the prepared card top.
Line the top unit up with the card base that is folded backwards and glue just the upper edges.
I finished the inside by taking the B&T 3" circle and folding it in half and gluing those halves together to give it more bulk since this is the lip that the easel sits on. I glued the half circle to the 3" New England Ivy circle only at the edges making sure that my card would fit into the pocket and then added a double bow and ribbon and a snowflake button. The placement of my circle unit was determined by the size of my gift card. I think I will go back and distressed the outer edges of the inside card with some New England Ivy ink to add something extra. The double bow with the gathered tails were added to the front of the card and I just love the effect.
What do you think?

Life's Good

The weather is starting to cool down here in southeastern Virginia and soon the leaves will begin to turn colors. Here is one of the cards that we made last week at my Hostess Club in honor of fall. I love the warm colors and the Art Philosophy cartridge made it so easy to do all the cuts. I used the Dreaming paper cut 1/4 inch smaller than my colonial white card base, the Oval 5 cut at 4 inches from Colonial White and then stamped with 2nd generation chocolate ink using the words from D1477 universal backgrounds. I distressed the edges with chocolate ink. Next I cut out 2 acorns from page 36 of the AP cartridge book at 1 inch in colonial white and 2 acorn caps from chocolate and embossed them using a cuttlebug folder.The acorns I stamped in desert sand using universal backgrounds and distressed the edges with desert sand to give some definition. The leaves were cut at 2 inches from page 34 of the AP book and stamped with the coordinating stamp that comes with the AP cartridge. They were inked first in Honey then before stamping I touched the edges on the Autumn Terracotta pad then stamped and edged with sponge dauber in chocolate. A chocolate grosgrain bow was added to tie the leaves and acorns together. The Ticket was from the You and Me stamp set D1495 and the ticket was cut from page 25 of the AP book at 1" stamped in chocolate and distressed with chocolate with a chocolate brad. Inside I have the little owl from the Pair a Phrase stamp set shown in an earlier post. 
I hope you like this, it was so easy to put together using the Art Philosophy cartridge.
As always to see a closer look at this card simply click on the card to enlarge.

I am so honored. I won an award! Actually 2 awards.

I received two awards this week while I was away from my computer at my daughter's home in Richmond. Wow I am truly blessed by good friends and such creative women. I am humbled that they selected me to receive this award and consider myself in amazing company. Thank you Caron Barnard at  Scraphappy Corner and Jackie Lupien at Cre8tive Cookie

This is the award itself and it was sent to me by both Caron and Jackie. Please visit their sites by clicking on the links above.

 Here's how it works:

The goal of the award is to spotlight up and coming bloggers who currently have less than 200 followers. The rules of the award are:
1. Thank the giver and link back to the blogger who gave it to you.
2. Reveal your top 5 picks and let them know by leaving a comment on their blog.
3. Copy and paste the award on your blog.
4. Have faith that your followers will spread the love to other bloggers.
5. And most of all - have fun!
So, now it's my turn to pass it on and I would like to share it with:

Joanie from Crafting with Joanie
Brenda from Stamp .Scrap. Create
Connie from Paper Pleats and Ribbon Roses
Tracey from Gr8scraps
Andrea from Girl plus Paper

Please visit these blogs and check out all the creativity going on there!

Sunday, September 18, 2011

How cute are these?

One of the wonderful and talented CTMH consultants, Tracey Sanders posted her creations on her blog, http://www.gr8scraps.blogspot.com/ complete with cutting directions and I had to give a couple of them a try. Please go to her blog and let her know how much you love them, she has so many great things that she has created using the new Art Philosophy cricut cartridge. If you haven't gotten yours yet you can go here and place your order. You won't believe how versatile this one cartridge is. Tracey made hers in the larger size to attach a jumbo candy cane to.


 I wanted to use them to attach pencils as little Christmas presents for Jackson's kindergarten class, I'll be looking for the fat ones that little hands use, but regular size ones were all I had available for the picture.

 I'll be more than happy to share the sizes that I reduced them down to if you are interested. Tracey has all the cutting sizes on her blog for the large ones. I cut my bow ties out of white cardstock and brayered over them in cranberry with a decorative brayer that I have instead of using patterned paper. Oh and did you notice the Angry Bird, another one of Tracey's creations, that I just love.
All of the cuts were done using the Art Philosophy cartridge and CTMH paper. On the Angry bird I also used some liquid glass on his eyes to make them shine.

Thursday, September 15, 2011

While supplies last

Hurry over to my website www.janeo.myctmh.com and check out the while supplies last section in the shop online. Some great CTMH products have just been added, level one kits, embellishments,block holder, top coats, ribbon just to name a few at up to 80 percent off. These won't last long at these prices. Check back daily as more items that were retired are added at huge discounts.

Tuesday, September 13, 2011

Enter to Win a Cricut Expression Machine

Rush on over to Close To My Hearts facebook page http://www.facebook.com/CloseToMyHeart?v=wall and enter to win a new Cricut Expression Machine from the link on the left side of the page. Even if you already own a personal cricut machine, the Expression is twice the size and tons of fun. What could be better than to win one for free. I've been showing you some of the terrific items you can make with the new Art Philosophy cricut cartridge and it pairs prefectly with the cricut expression. Sweepstakes ends September 26, 2011 @ 11:59 pm (MDT.

Thursday, September 1, 2011

CTMH Art Philosophy cricut images

I know I keep talking about this cricut cartridge but honestly I don't know if I'll ever learn all the cool things that you can make with it. I'm finding something new everyday and just am excited to share them with you. Here are some closeup images of the the cuts you'll be making with your Art Philosophy cartridge.
These are just a few of the borders and decorated mats you can cut with ease. The borders were cut at 1 1/2 inches and are 9 inches long. I don't own a 12x24 mat yet (notice the yet) but I understand that you can cut them 12 inches long with the longer mat. How gorgeous are those?  ....then if you dry embossed them as well. Oh my what possibitities.

Packing tape and Glitter technique

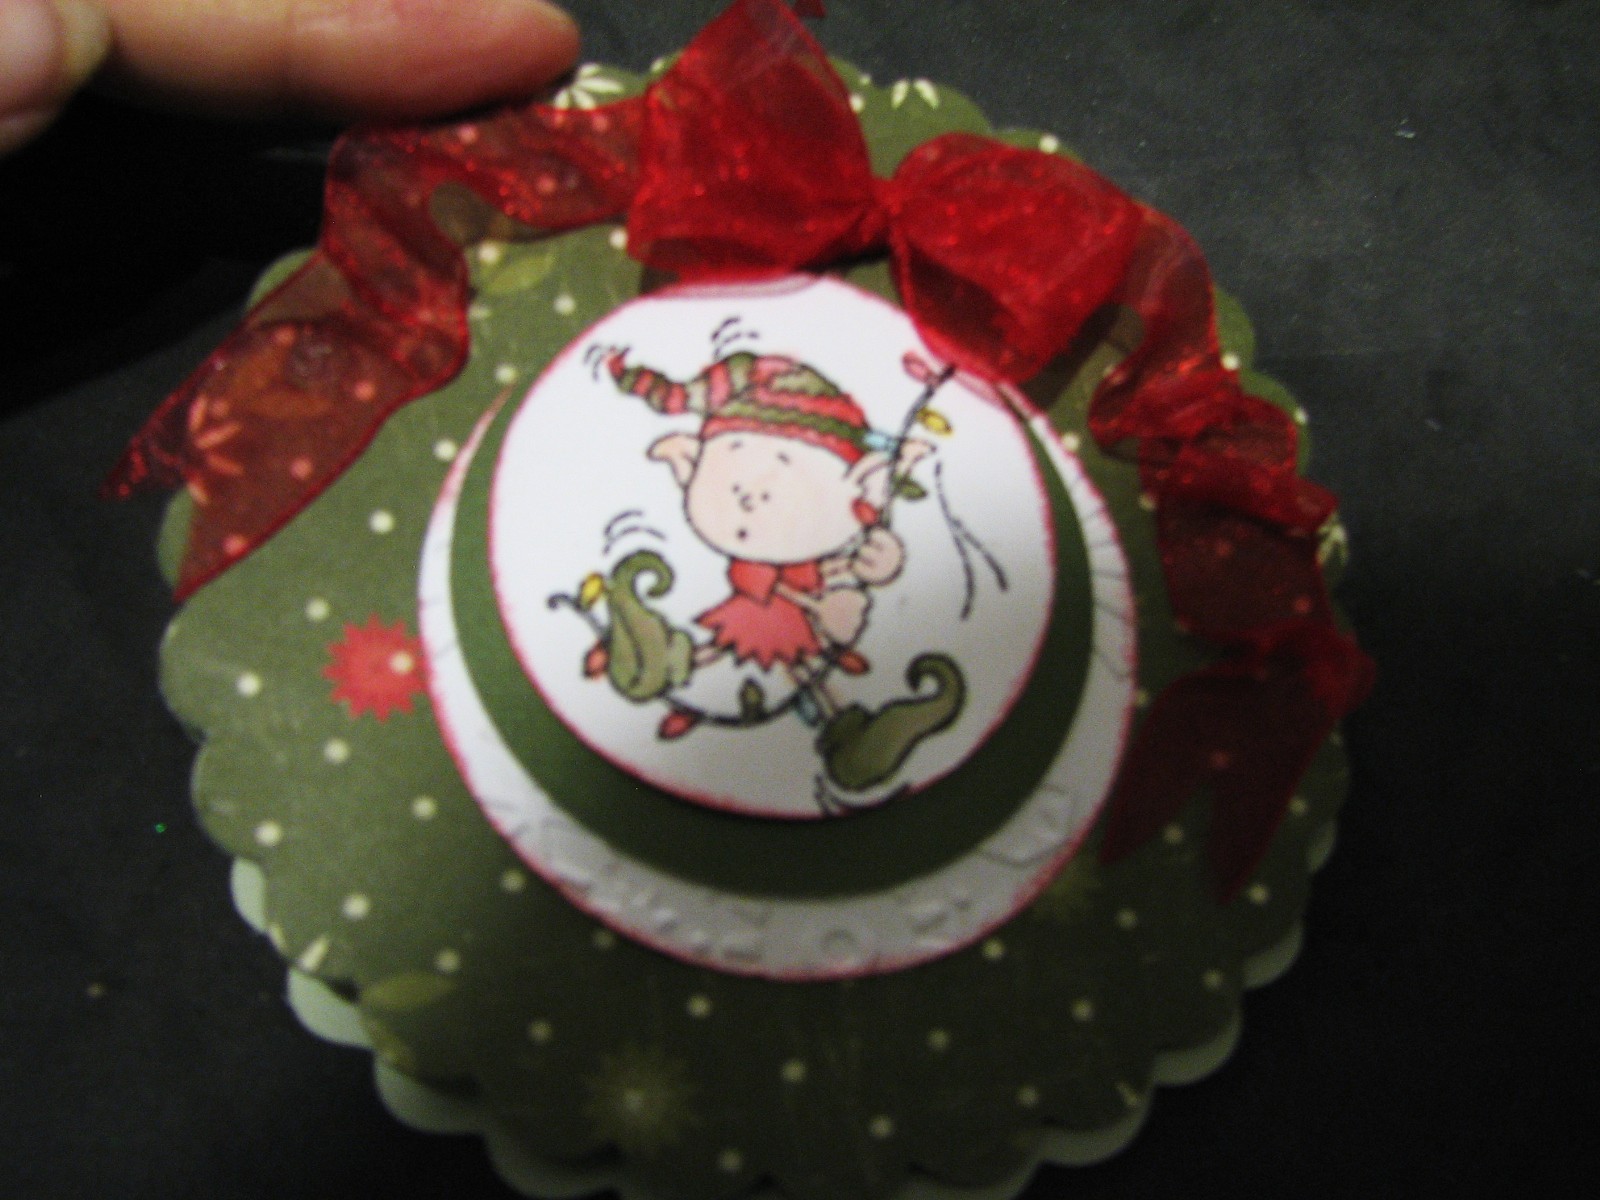
How do packing tape and glitter create a technique you can use for your paper crafts? Well let me show you. I love glitter, what I don't like is how it gets all over everything long after you have made your card. As a matter of fact that is exactly why Operation Write Home refuses cards made with glitter for the troops, cause it reflects light and can get on a soldier's uniform and can be very dangerous. That being said this technique helps with the glitter shedding problem and lets you put glitter easily in places otherwise difficult to work with. Here is a card I made using the AP Cricut cartridge, some silver metalic paper, red glitter, packing tape, scotch tape a bit of ribbon some black and red cardstock and the stamp set Peace on Earth with silver embossing powder. I hope you will be able to see the glitz, it doesn't photograph nearly as shinny as it is.
I started out cuttng 2 corner decorative pieces with white cardstock at size 2 1/2 inches, It was the image on the Tag 2 key with the font layer selected. sorry the photo is blurry.


Then I intertwined them and covered them with green glitter glue and set aside to dry completely.

I cut the ornament shape on the Banner 5 key with the tag shift at 3 inches out of some silver metalic paper.


Cover theBACKof the open design with packing tape, STICKY SIDE DOWN, make sure the tape covers the entire area where you want the glitter, if you need a larger piece use 2 or use some scotch tape if just a area needs to be covered
Turn the piece over and pour glitter over the entire area, pressing the glitter into the cutout area. Then dump the excess glitter back into the container and brush off the remaining excess, the glitter will adhere to the tape and only the tape so you can wipe your ornament clean.
Next take scotch tape and apply to the BACK of your black cardstock sticky side DOWN, leaving 1/4 inch off the paper all the way around the edge.
Turn over and again cover the exposed  tape with glitter and press glitter into the tape. Pour excess back and brush off card. You can now glue your dried green glitter swirls to your card front. Tie a red metalic ribbon onto top of ornament and adhere ornament to card front.

Emboss sentiment using versamark and silver embossing powder at the bottom of a 4 5/8 x 6 3/4 black cardstock and mount onto a cranberry 5x7 card

Pair-a-Phrase Artwork

Close To My Heart continues to amaze me with the wonderful images they chose for their stamp sets and how versatile they are for so many occasions. This is so true with the newest stamp set they designed for National Stamping Month that begins today. A double stamp set, the first ever for CTMH, which includes lots of clever phrases and coordinating images you'll use throughout the year. BUT the BEST part is you can get this wonderful double stamp set for FREE.

You all know how much I love CTMH's Event Calendars Z126 and I decided to pair this wonderful stamp set with the event calendar after seeing some artwork by Jen Rubio. You can check out her wonderful work at http://www.jenrubio.blogspot.com/. All of these toppers were made using just this one stamp set, a 3.5 x 3.5 piece of background pattern paper and some scraps of colored cardstock or white cardstock colored with inks and a brayer to make my own colored cardstock. I used a waterbrush and the ink smooshed onto the top of the ink pad container to color them. If you have any questions just email me or post in the comments and I'll be happy to explain as best I can. Click on any image to enlarge. I'd love to know what you think.


As I was photography these toppers for the blog, I got to thinking how cute they would be if you made up another set and used them for all occasion cards to have on hand all year. So by using just a cuttlebugged embossed card and adding the topper to the center front, I have 12 all occasion cards using just one stamp set and some scraps.


How can you get this limited edition, exclusive stamp set for FREE? Well this month ONLY if you place an order of at least $75 either through me or through my website www.ctmh.com/janeo  shop online you will receive this double set FREE. (tax and shipping/handling charges apply). AND you will also qualify to purchase the September Stamp of the Month for $5.00. Don't let these terrific limited edition stamps slip pass you.


The BEST DEAL this month would be to purchase the CTMH exclusive Art Philosophy Cricut cartridge bundle for $99.00 thus qualifying for the September National Stamping month special Pair-a-Phrase and then add the September Stamp of the Month Limited Edition for $5.00. You would then be receiving 6 great stamp sets, a very versatile cricut cartridge and 3 sheets of special chipboard elements for $104 plus tax/shipping. A value of $178.54 saving over $74.